Needlepoint Kalem or Knitting Stitch

The Kalem/Knitting stitch looks like a knitting stockinette stitch. And, if you need five reasons why you should have this stitch in your repertoire, we have them.
Five Reasons To Love the Needlepoint Kalem Stitch:
- It’s easy to learn. It will take you about two minutes to figure out how this stitch works and then it’s stress-free stitching. We appreciate a stitch that easily fits in and around other features without a lot of mathematical calculation, and this is it!
- It’s fast. I think we all enjoy a stitch that moves along at a speedy pace.
- It’s not fussy. The needlepoint Kalem Stitch works well with any thread choice. Because it’s a long diagonal stitch you need to pay attention to your thread tension, but aside from that you could use kitchen string and get this stitch to look good (joking about the kitchen string - kinda).
- It’s a good filler stitch - see reasons above. The needlepoint Kalem Stitch is a good choice for geometric designs and medium size areas where you want texture and direction. This probably isn't a great stitch for large areas of background as it's a highly textured stitch and so doesn't really recede into the background. Use it to highlight features instead. It makes great tree trunks, clothing, hillsides...
- It's versatile. You can make this stitch bigger or smaller depending upon the area you have available.
How To Stitch The Needlepoint Kalem Stitch
The Kalem/Knitting stitch can be worked over 2 or more intersections. We're about to show you it worked over two stitch intersections (use for small areas) and over four stitch intersections (use for larger areas).
Kalem Stitch Over-Two
The stitch is worked in vertical columns. Here we start at the bottom (but this isn't essential) with the numbered vertical column, and then go down to complete the stitch (lettered column).
The small compensating stitches (in red) are to make the top and bottom of the stitch a straight line. These can be added at the end, but it's probably easier to put them in as you work the columns. The compensation stitches will be added top and bottom if you want straight lines, even though the diagram only shows them at the top.


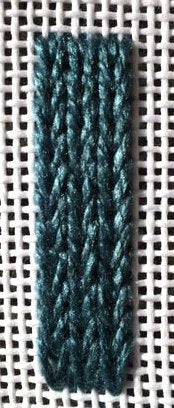
You can see it forms a dense, highly textured stitch in a knitting pattern.
Kalem Stitch Over-Four

When stitched over four, note how you skip an intersection as you move up and down the columns. It still creates a dense, textured stitch, just longer than the over-two option.
If you turn the stitch on its side it looks like tire tracks. So if you want the stitch to flow horizontally just work the stitch instructions a quarter turned.
We hope you find a use for the needlepoint Kalem Stitch on a canvas near you very soon.