How To Shade Needlepoint

Learn two stress-free ways to shade a needlepoint canvas. Many needlepoint canvases have areas of shading...

There are a couple of ways you might approach the shading on this needlepoint canvas.
1. How To Shade Needlepoint - Mix The Threads In The Needle.

If you are stitching with a divisible thread (i.e. you can split the strands), you can mix strands of different shades within the needle. All you do is separate the strands from 2 or 3 different colored skeins and put them together again by mixing them up. Here's how...
Let's say you have three colors you want to shade needlepoint with - dark brown, medium brown, light brown - and you're using a 3-ply thread. You could start in the darkest area using all 3 plies of the dark brown. Then, when you start stitching into the slightly paler brown area of the canvas, you could remove one of the strands of dark brown and replace it with a strand of medium brown. As you work toward the paler color areas change the color combinations until you have more paler colors than darker in your needle. There are many ways you can combine the threads. This same technique works for 6-ply embroidery floss, except you might use two strands of each color.
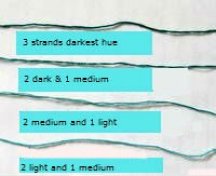 |
| One way to combine threads in a needle to use on a shaded needlepoint canvas. |
This is a very easy way of graduating color from dark to light, or vice versa, and the stitcher has complete control over how to blend the colors.
You can even go crazy-wild and blend completely different colors in your needle if you want a kaleidoscope effect. The possibilities are almost endless!

To master how to shade needlepoint by mixing threads in the needle is just one more way needlepoint can be interesting and fun. Here's another way...
2. How To Shade Needlepoint - Play Checkers
If your thread can't be divided you can't mix the colors in the needle. Instead, you can shade a needlepoint canvas by using a technique called checker-boarding. This is where you randomly (well, sort of) place stitches of each color so that the different colors are mixed together in an undefined pattern.Checkerboarding is especially useful for large areas where the color gradually changes shade. This often happens with sky and sea. For example, the sea and sky on this Beach Boys canvas subtly changes, and you would want to reflect this in your stitching.
 |
| The sand, sea and sky all have subtle shifts in color on this Beach Boys canvas by Vicky Mount. Using a checkerboarding technique to shade is one way of approaching this. |
To use checkerboarding, you might thread your needle with the darkest blue and stitch in a few rows of the dark area at the very top of the sky. Then, when you get to where the canvas color starts to become paler, stitch every second or every third or fourth stitch with this darkest shade.
Do this random stitching for two or three rows. Then, thread up with a slightly paler blue and fill in between the random dark blue stitches with this paler blue.
Carry on this medium blue for a few rows to where the color becomes paler still, then start stitching only every second, third or fourth stitch (randomly) with this medium blue color.
Thread a needle with a paler blue and fill in between the middle blue stitches, like you did before, continuing on until you're only stitching with light blue. The colors are being randomly mixed and shaded on the canvas and you're not creating a straight line of color change.
General Tips on How to Shade Needlepoint
First of all, don't sweat it. Precisely how you lay down your shading is up you - these decisions are part of the creative needlepoint process and there's no right or wrong way. You can blend with only two colors, or you can use 4 or 5 shades of the same color family. As a rule of thumb, if it's a small area, use fewer colors.As a guide, the shaded or transitional area (where you are checkerboarding), should be about the same size as the solid color areas on either side.
Practise your shading skills on a handpainted needlepoint canvas from our extensive collection...
